In order to exchange information with your colleagues about a problem, you need to create a new case. Within this case you can then exchange and collect all information. To do this, click on „Create case“.
Desktop - Open Cases
Create case

Create a new case

Add case title
Now enter a case title and optionally describe the problem directly.

Select filter
Now you optionally already enter corresponding filters, with which you can find the case later in the archive more easily. You can also skip setting the filters.

Add employees
Now select the colleagues with whom you want to exchange information. Only the people you invite to the case will be able to see it. When you have selected the colleagues, click on „Create case“.
Completion
Now you are in the case. The arrow in the top left corner will take you back to your case overview. On the next pages the different functions within a case will be explained.
HIER BEGINNT EIN NEUER ABSCHNITT
Desktop - Open cases
Send messages
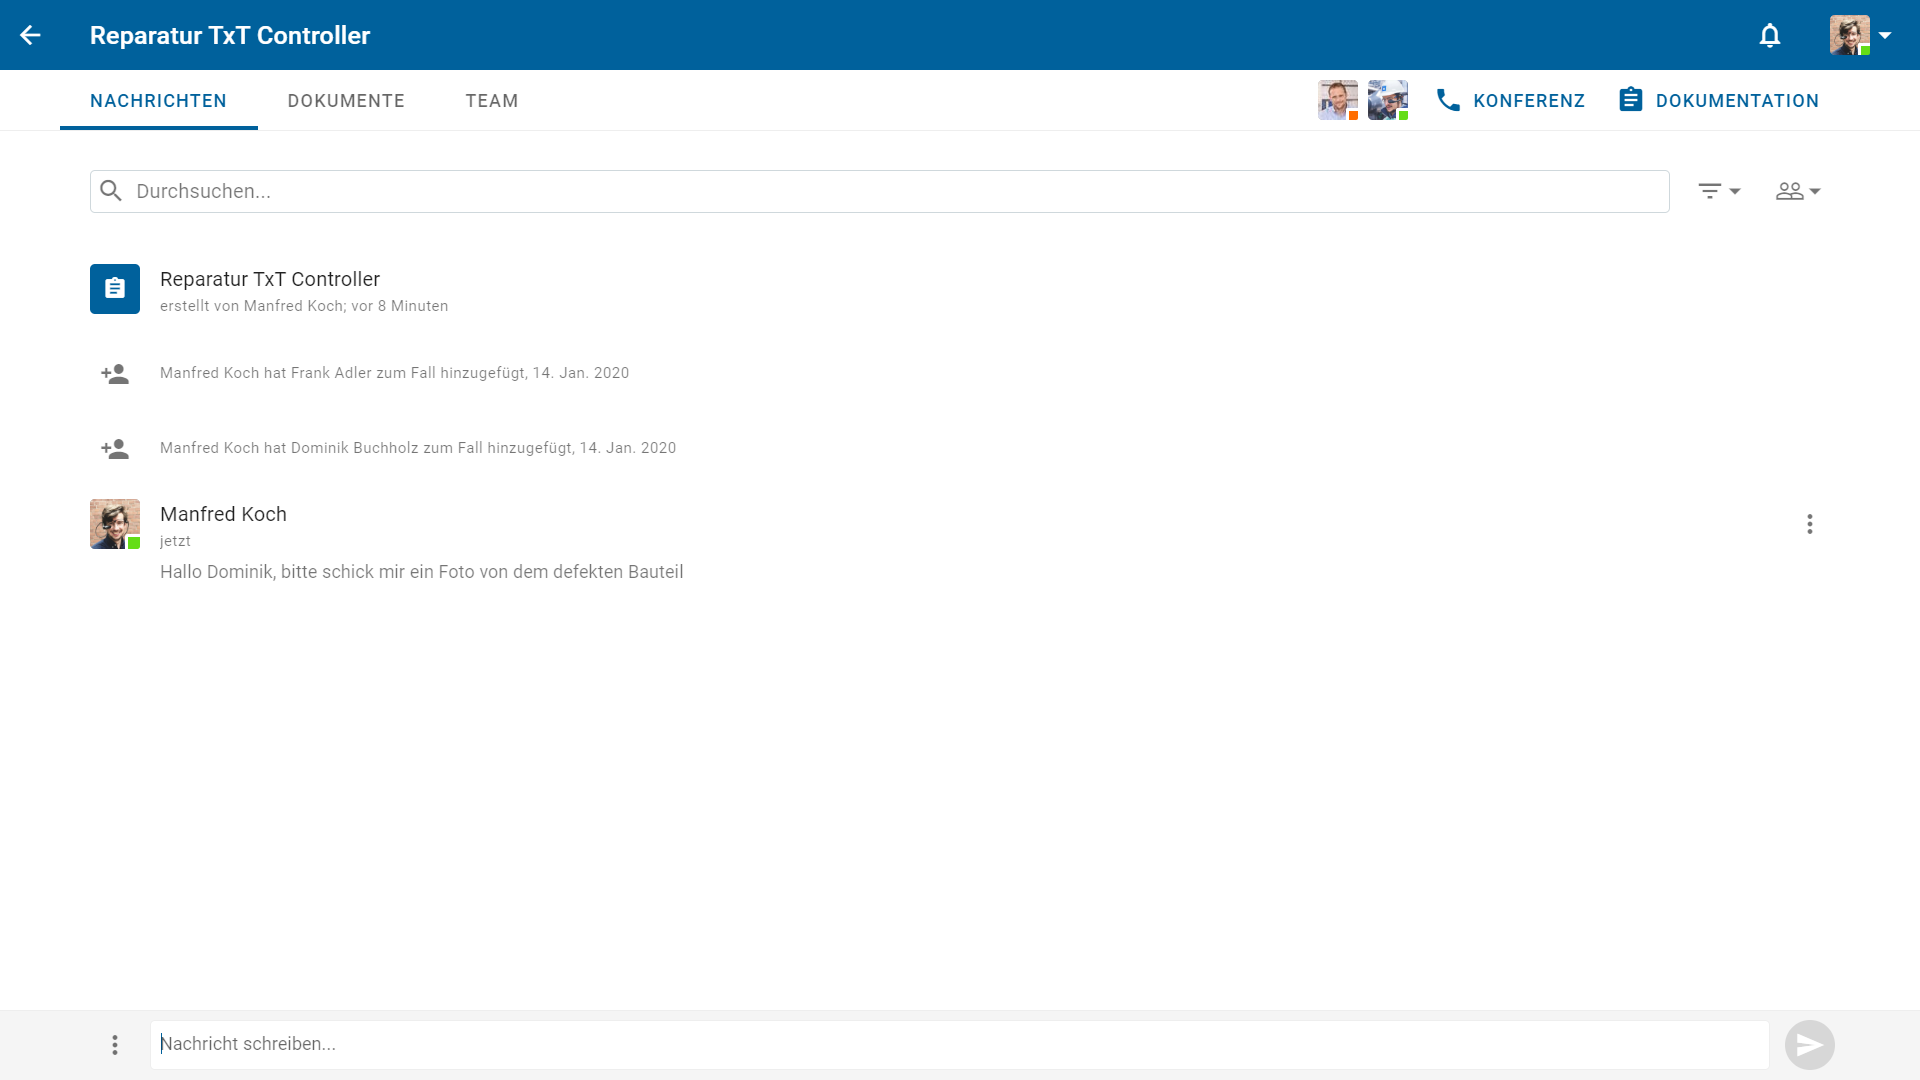
Send messages
Within a case, messages and documents are displayed chronologically. Each participant of a case can see the entire history. To write a message, click in the message line, write your messages and then click the Send button in the bottom right corner.

Edit messages
You can edit or delete messages that you have sent at any time. To do this, simply click on the three dots to the right of the message you have sent.
HIER BEGINNT EIN NEUER ABSCHNITT
Desktop - Open cases
Automatic translation
Translate received message
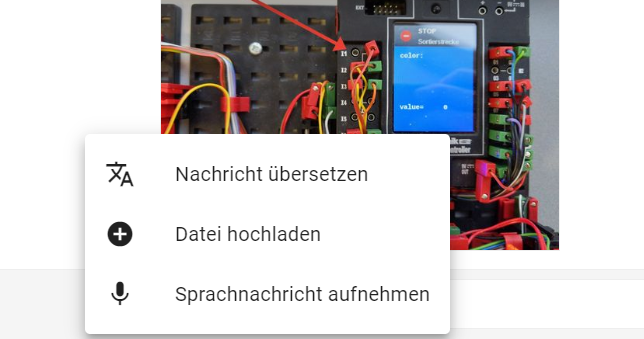
Text messages can be translated directly into different languages. To translate a received message, click on the three dots on the right edge next to the message. Now click on „Translate message“ and select any language.
Translate messages before sending
You can also send messages in another language. To do this, click on the three dots to the left of the text input field and then click on „Translate message“. Now write your message in the text line. The translated text will be displayed directly above it. You can also change the language later. To send the translated text, click on the two arrows on the right side of the translated text. The translated text will then be moved to your text line and can be adjusted as needed and finally sent.
HIER BEGINNT EIN NEUER ABSCHNITT
Desktop - Open cases
Images and documents
Upload and send files
You can also upload images, documents and files. To do this, simply click on the three dots to the left of the message line and select „Upload file“. Now you can upload any file from your PC to the case.

Delete sent files
You can also delete images and documents that you have uploaded at any time. To do this, simply click on the three dots on the right edge in the message history.
HIER BEGINNT EIN NEUER ABSCHNITT
Desktop - Open cases
Edit images

Edit sent images
Images that have been sent via the application can also be edited directly in the application. To do this, click on the image to open it and then click on the pencil icon in the upper right corner of the screen to edit the image.
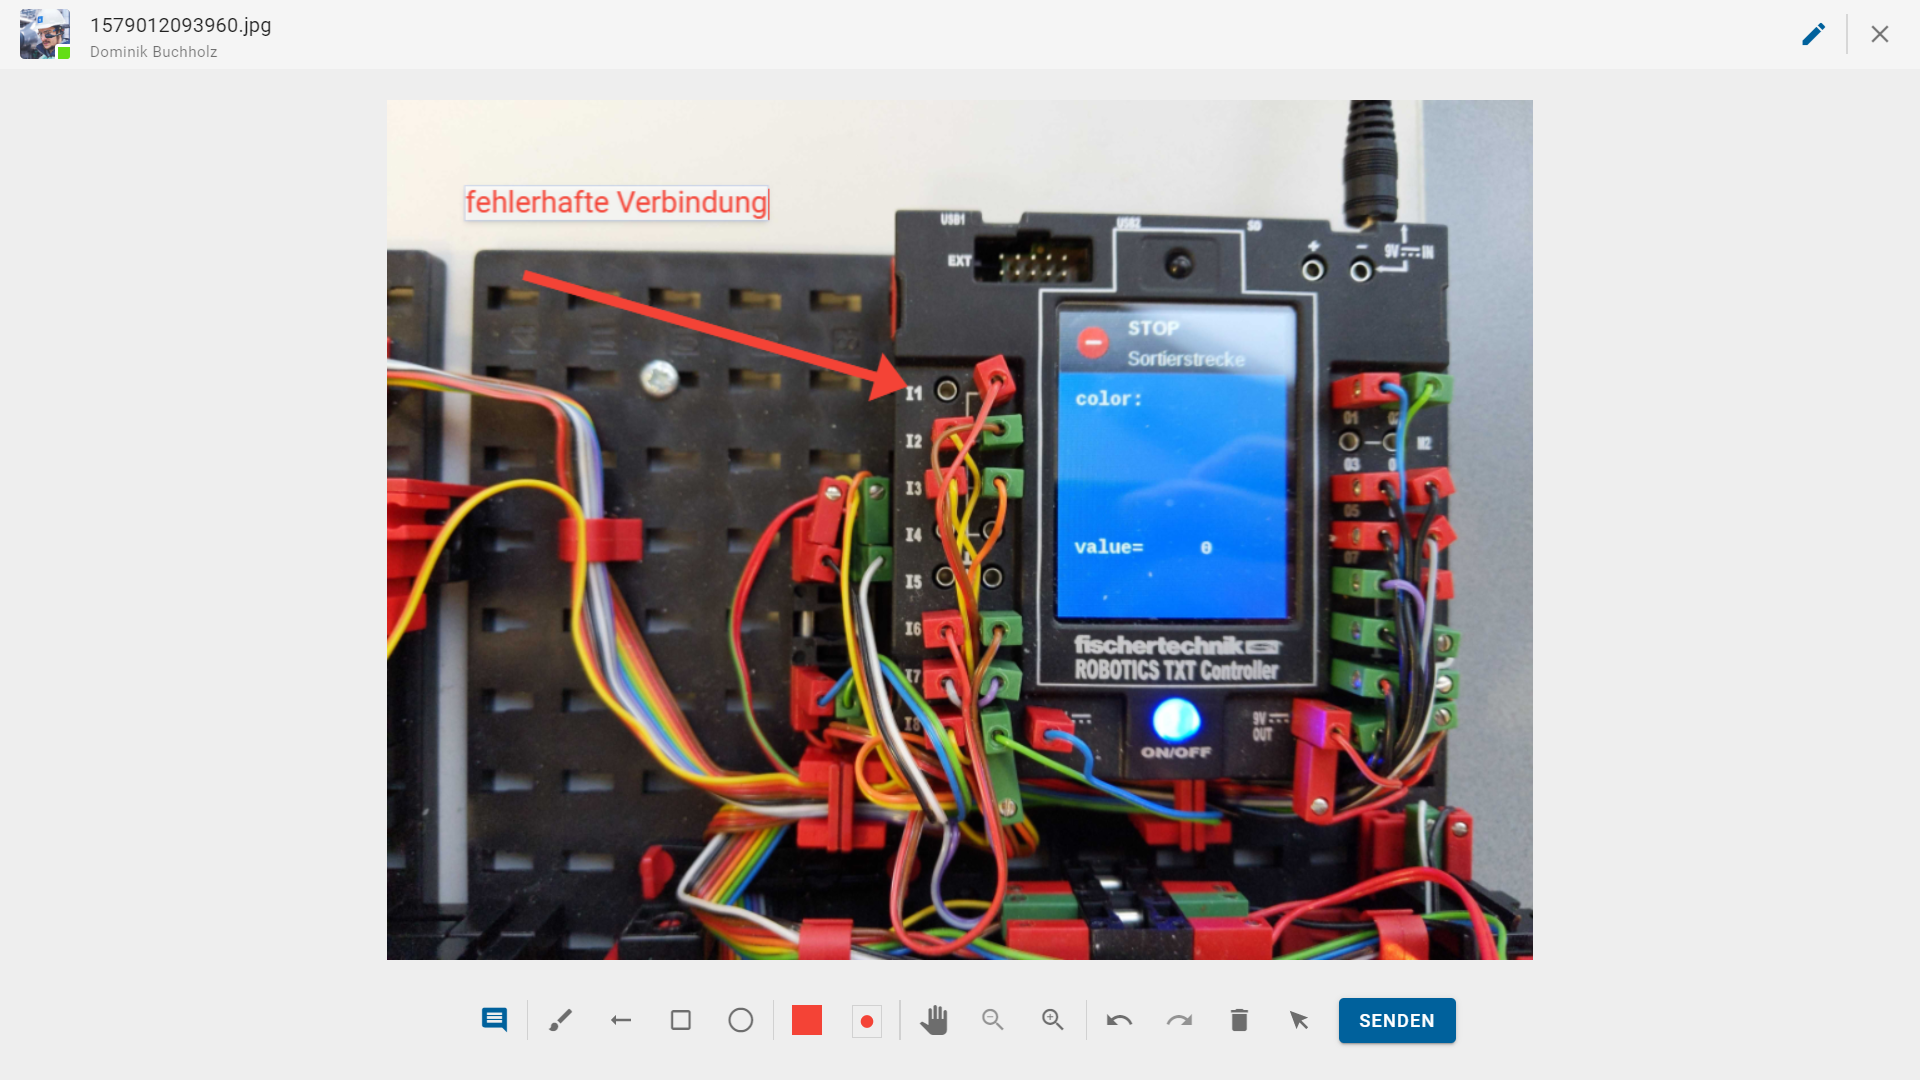
Use editing tool
In the bottom bar there are different editing tools that you can select as needed. Besides the freehand tool, you can draw arrows, circles and squares to mark an element in the image, for example. The colors can be changed and you can adjust the stroke width. To save your editing, click on „send“.
HIER BEGINNT EIN NEUER ABSCHNITT
Desktop - Open cases
Videoconference
Start conference
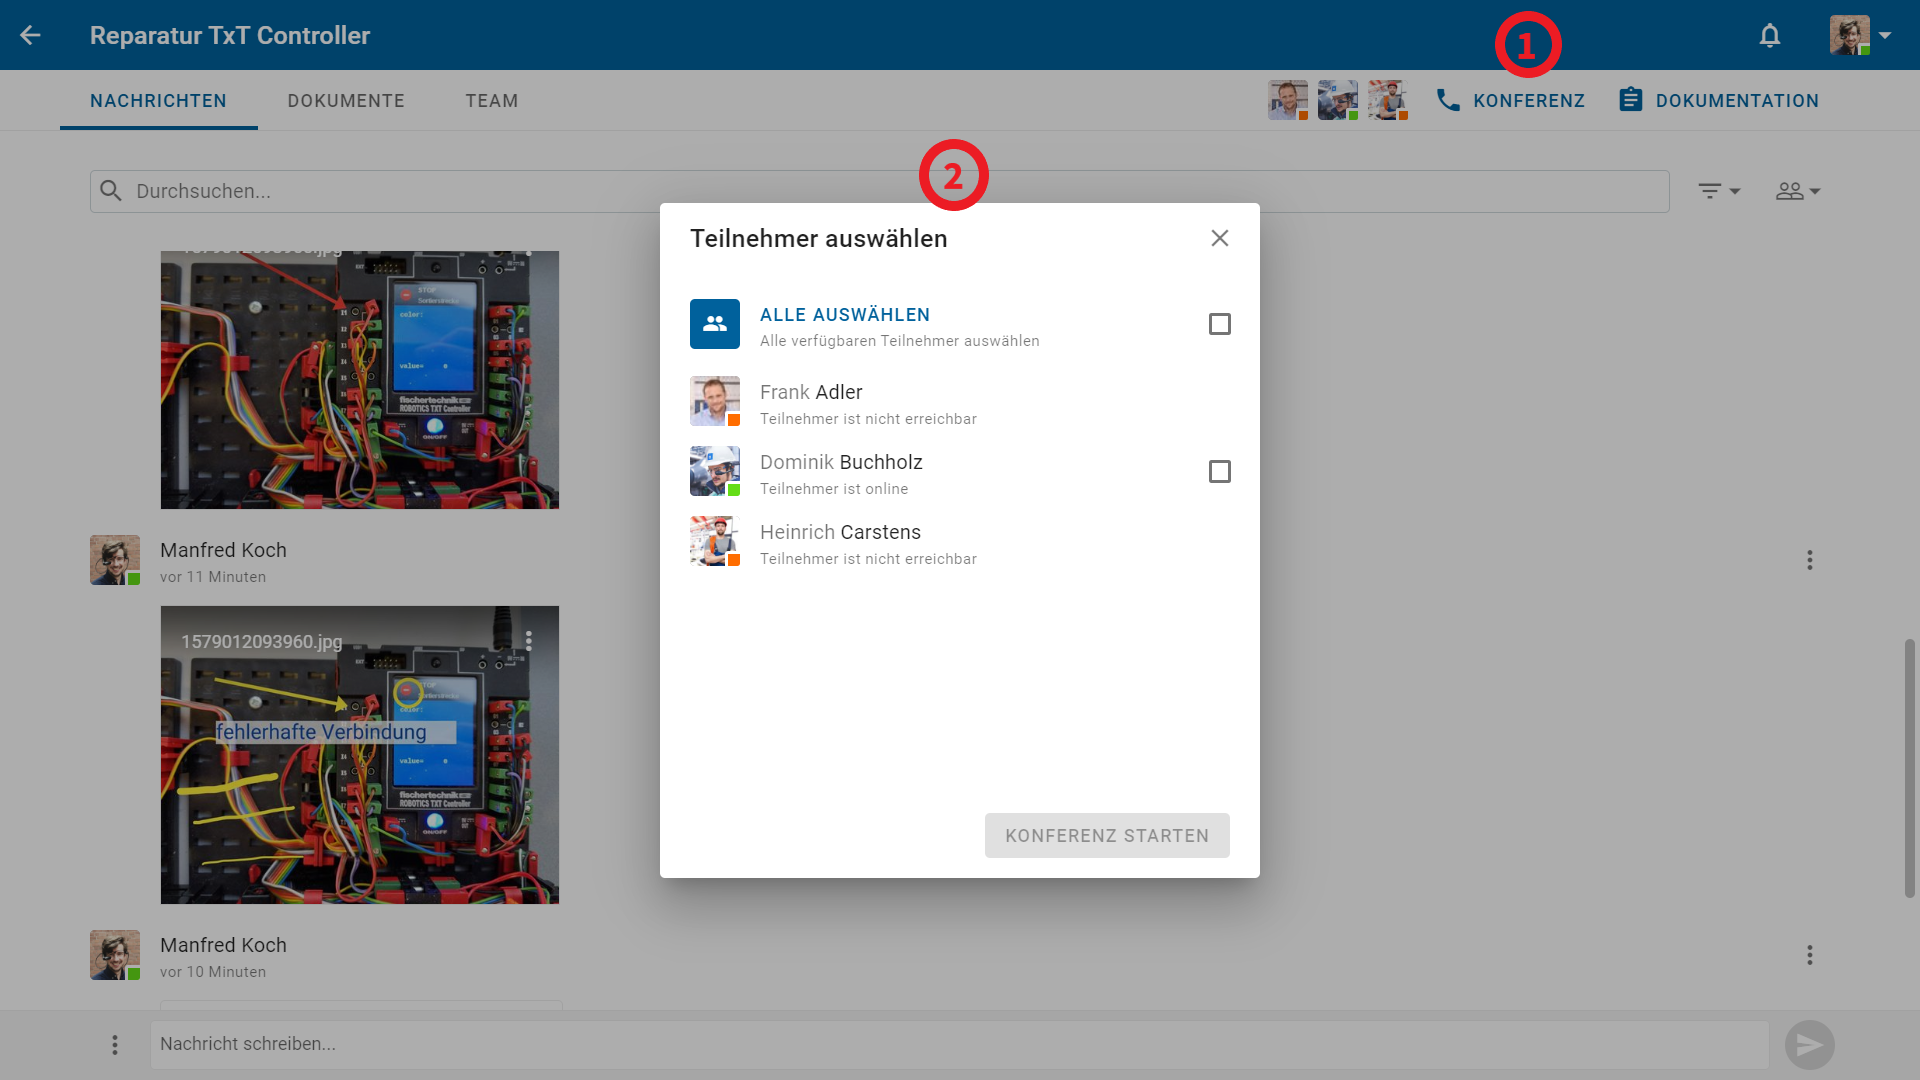
To start a videoconference, click on „Conference“ at the top right of the screen. In the next step, select the participants for the video conference. A video conference always takes place within a case. Therefore, you can only select the participants who are members of the case.

Conference mode
If you have started a conference, you will first be in conference mode. Here you can see all participants of the conference. To set the focus on a video image, simply click on the corresponding image.
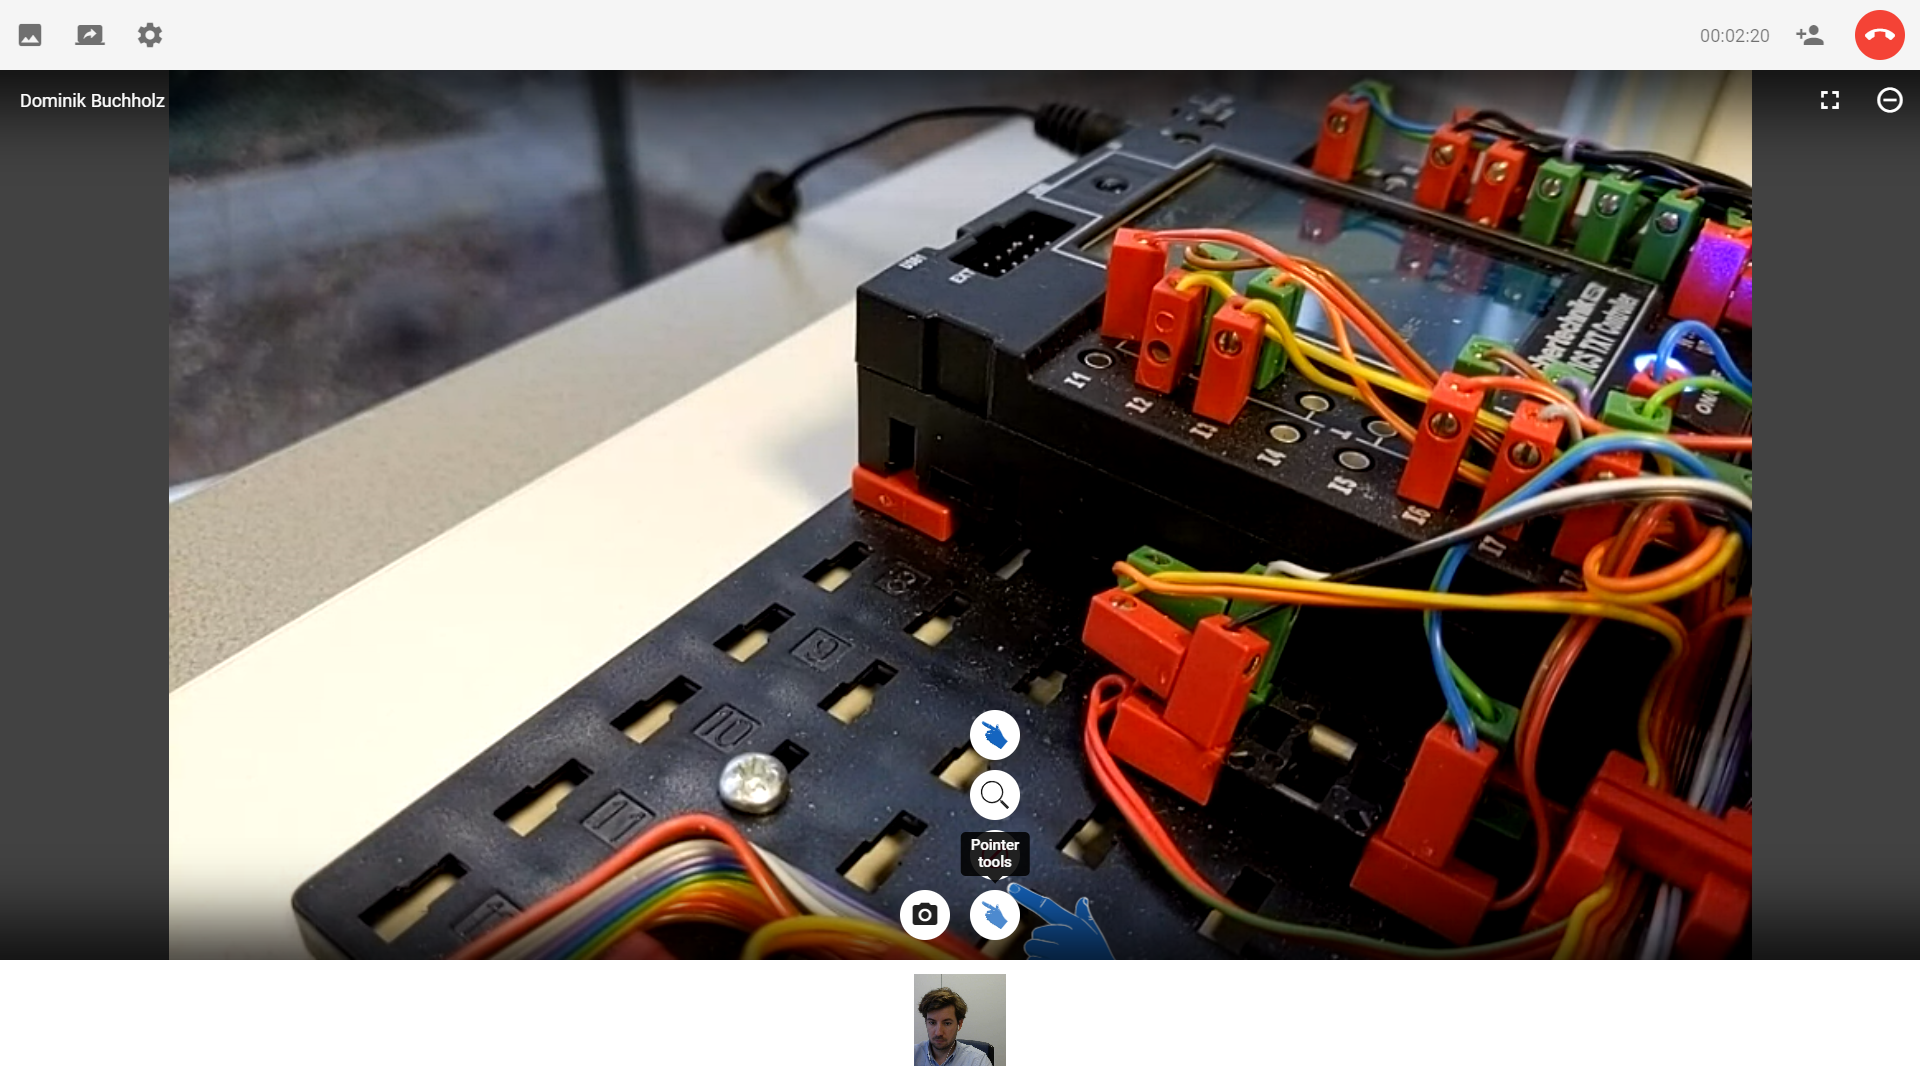
Working mode
When you have set the focus on a participant, you are in the so-called working mode. Now their virtual pointer tools are activated, with which you can display something in the live image. In addition to the pointer tools, you also have the option to take a screenshot of the video transmission, which is then saved as an image in the case.
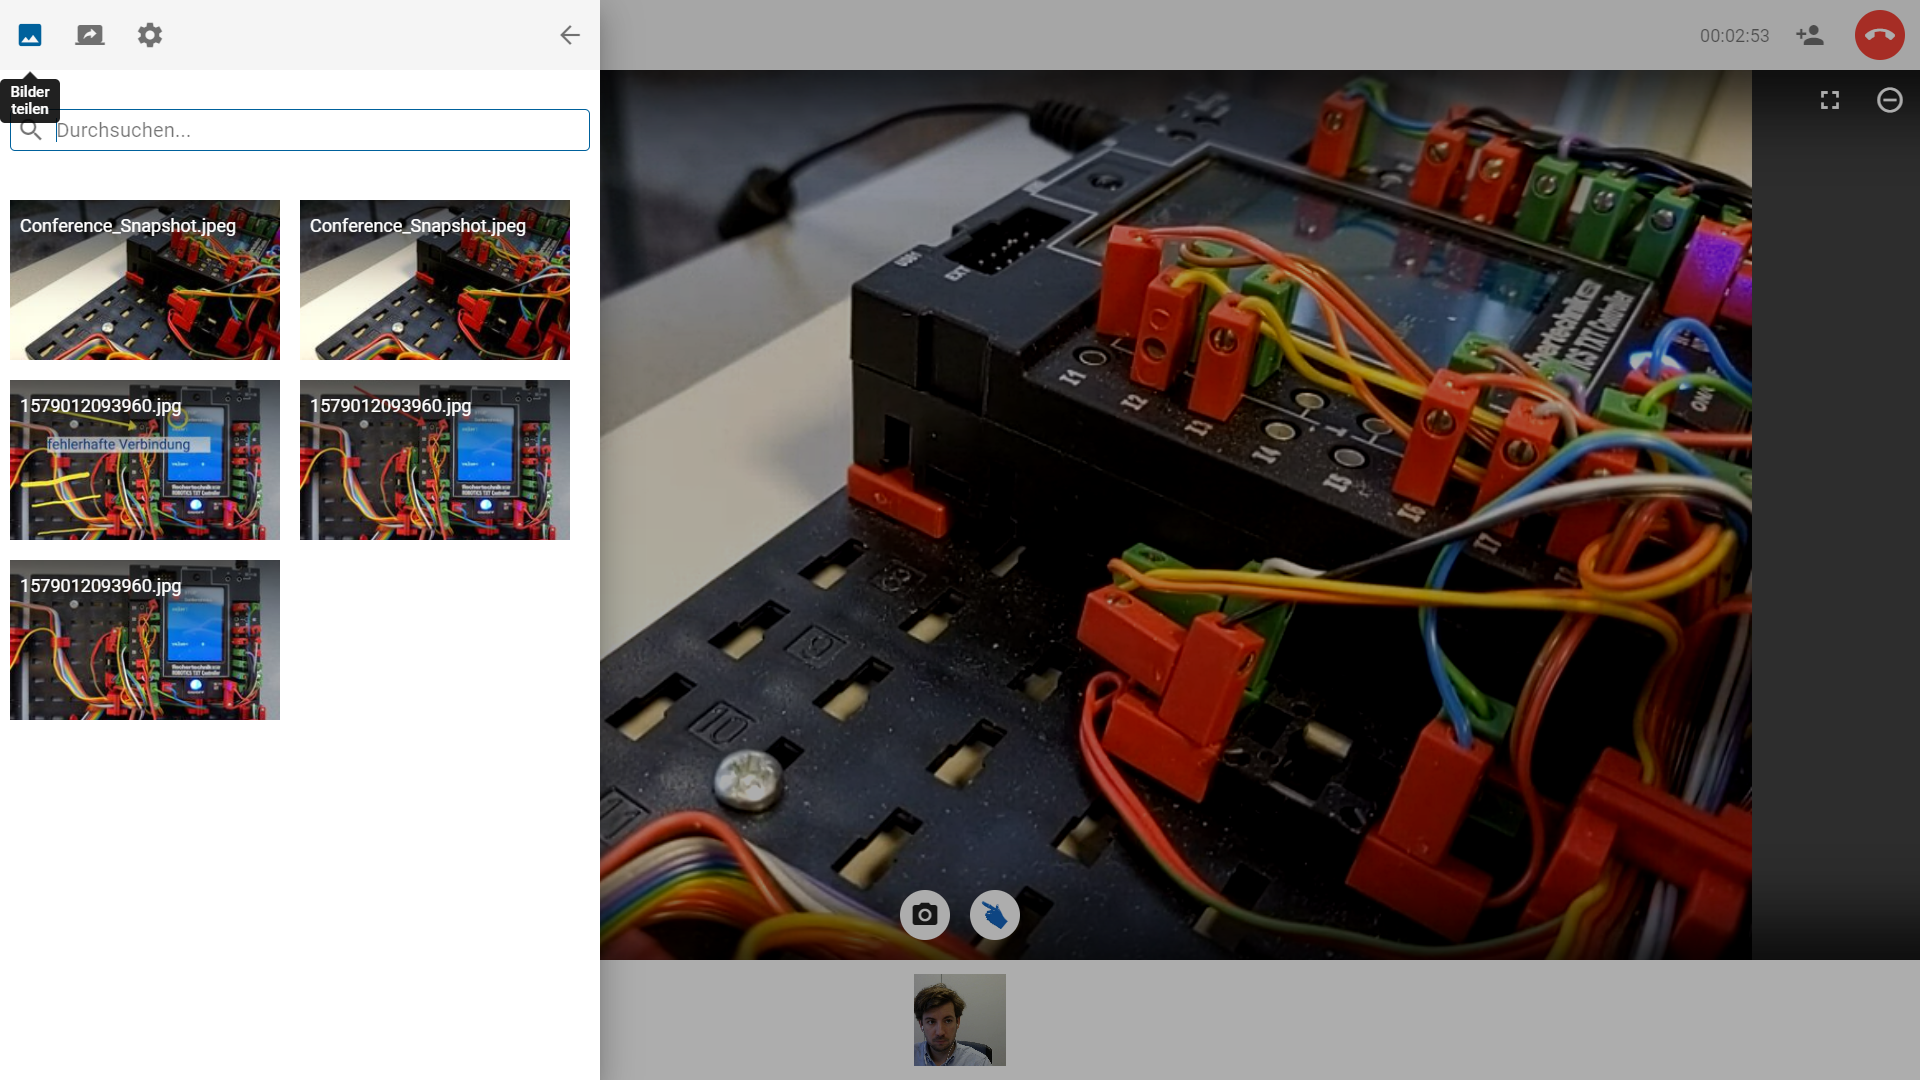
Share and edit images during a conference
Within a video conference, you can share images and edit them synchronously with the participants in the conference. To do this, click on „Share images“ in the upper left margin. Now you can select one of the images that were shared in the case. If you click on one of the images, the image editing mode will open, which you already know from the Edit images section. The only difference is that the image editing mode is now live in the conference and every participant can edit the image.
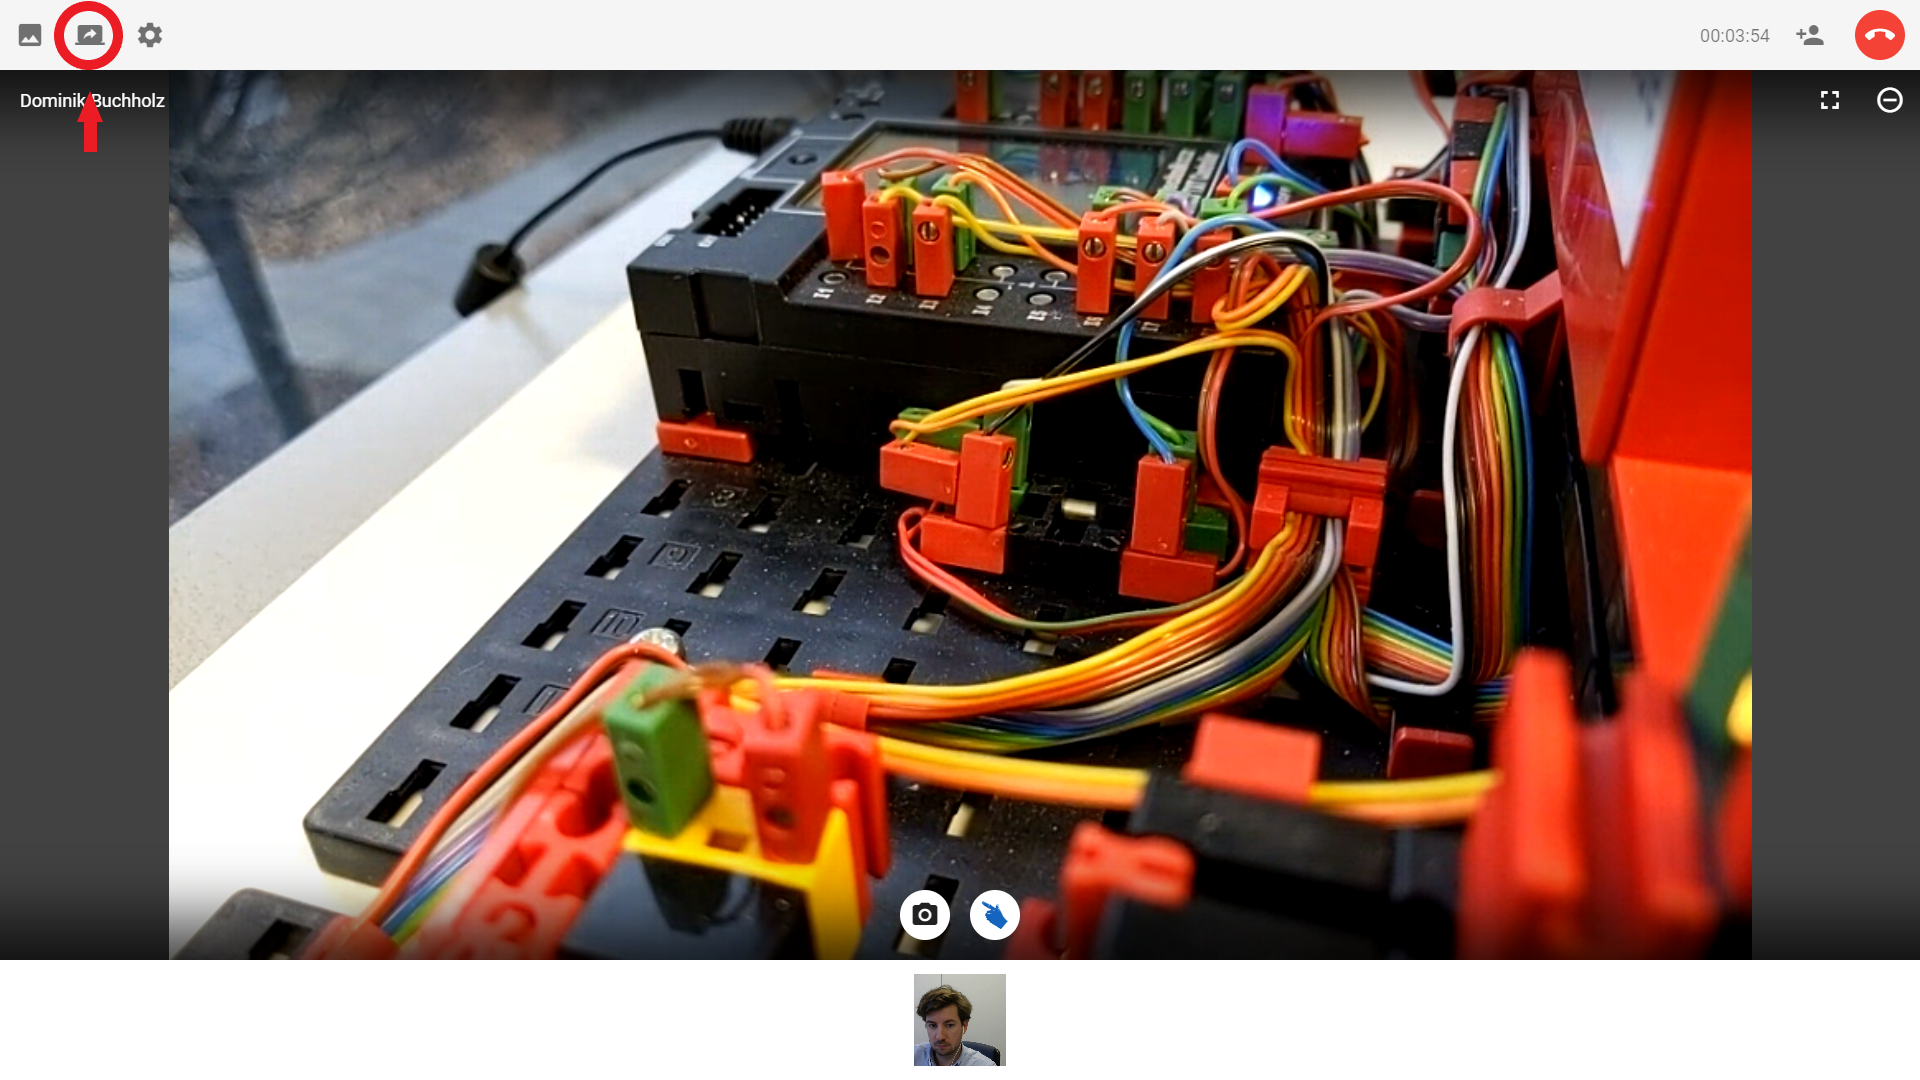
Share screen during a conference
If you want to share your screen with your conference partner, e.g. to work together on documents outside the application, you can easily do that by clicking on the middle icon in the upper left margin. Your conference partner will then see all the content on your desktop that you also see.
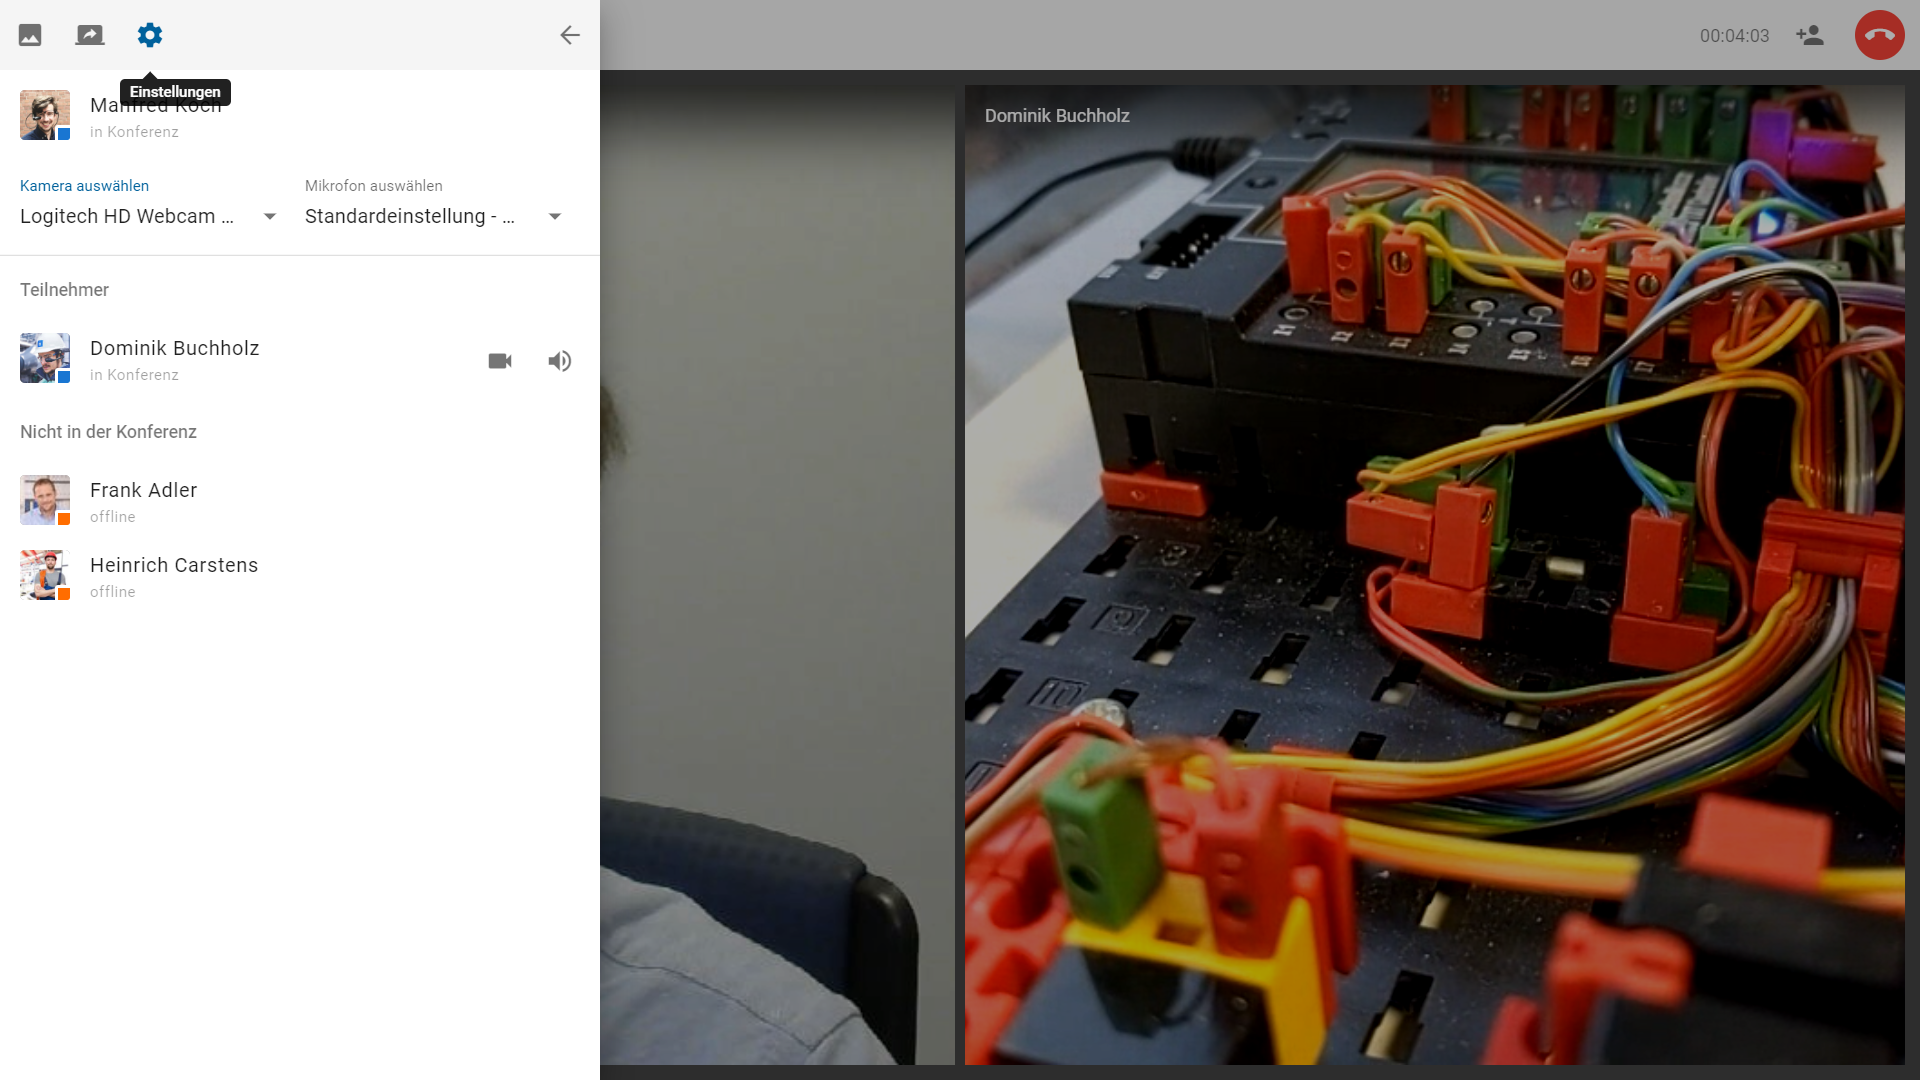
Open settings during a conference
During a conference, you have further setting options that affect your camera and microphone. For example, you can switch off the sound during a conference if you are only interested in the image content or if you are already verbally connected to the other party. The same applies to the image content, of course, if you only need to discuss something with the other party but do not want any visual image transmission. To do this, simply click on the settings icon in the upper left corner of the screen and adjust the sound and image according to your wishes.
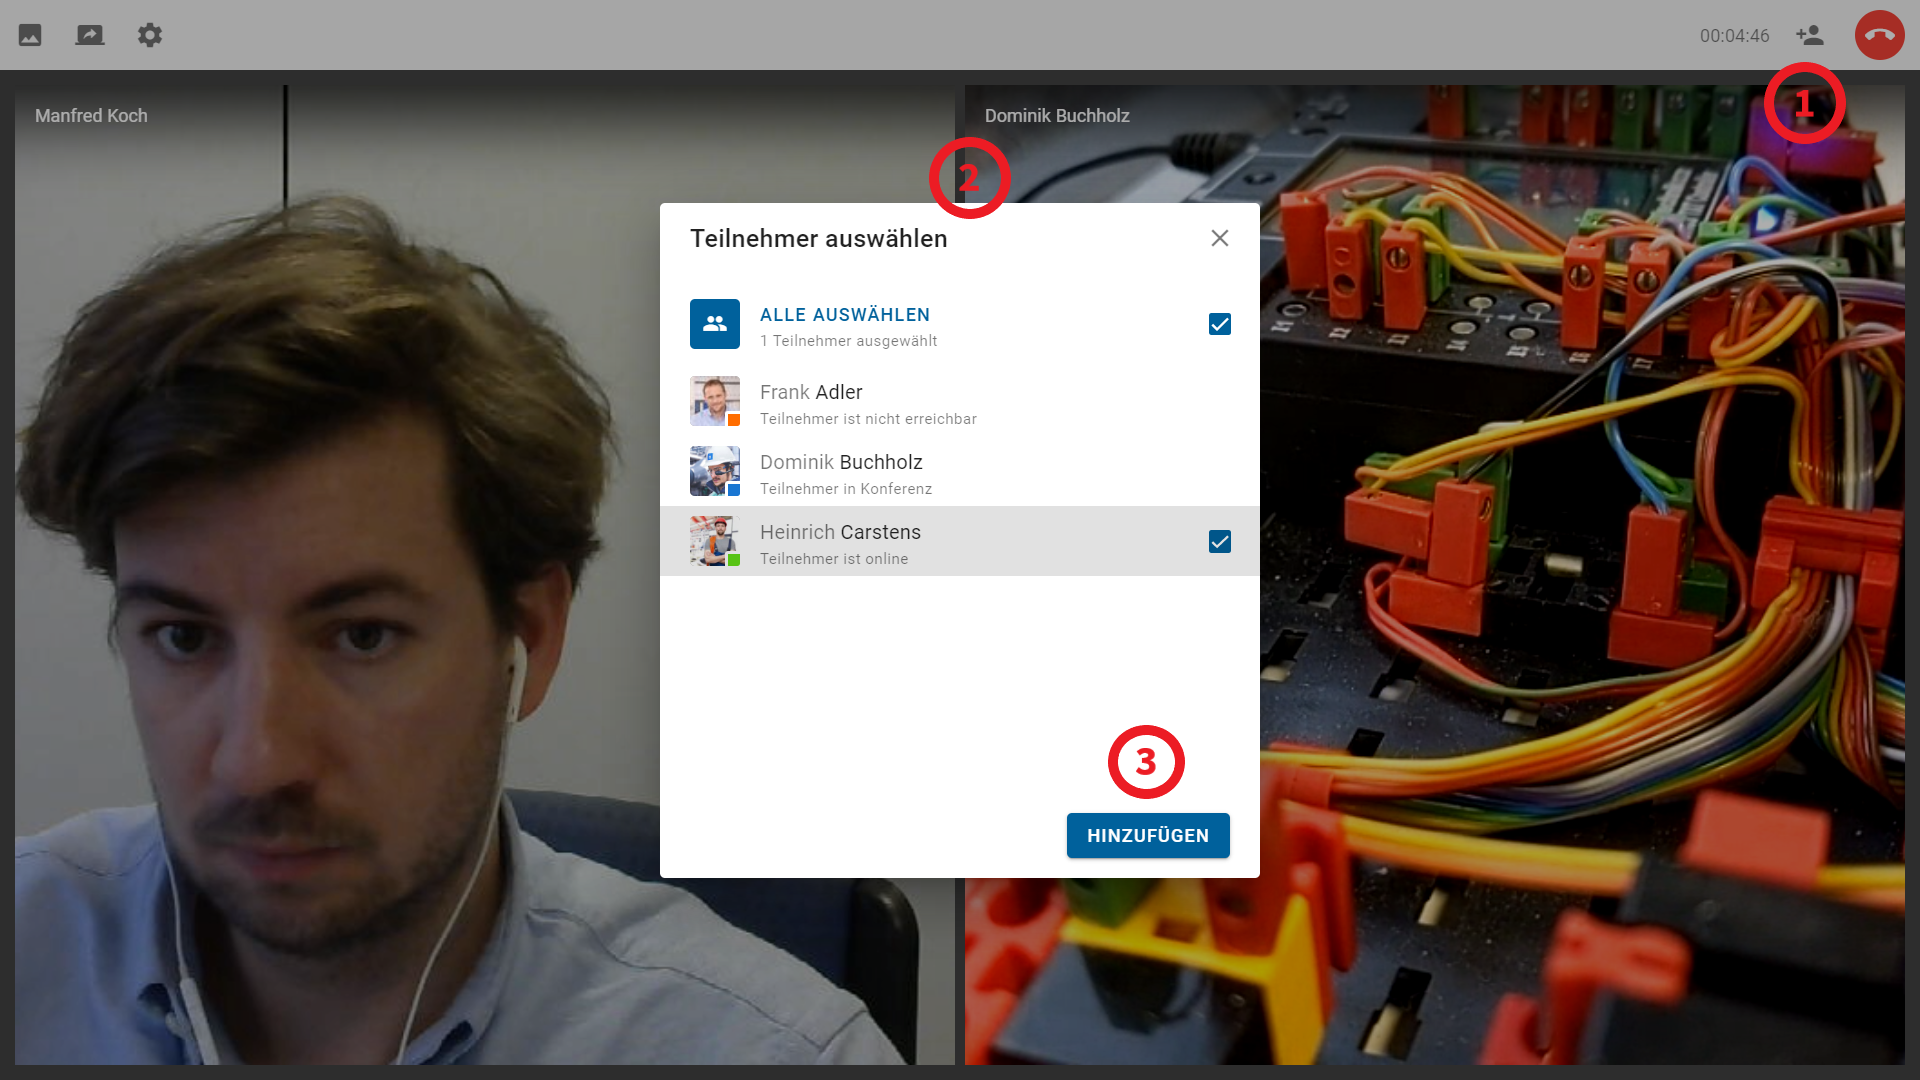
Add more participants to the conference
If you want to invite additional participants during a conference, simply click on the corresponding icon in the upper right corner of the screen. Then a small window opens with a list of all members of this case. Select the people you want to add to the conference and click on „add“.
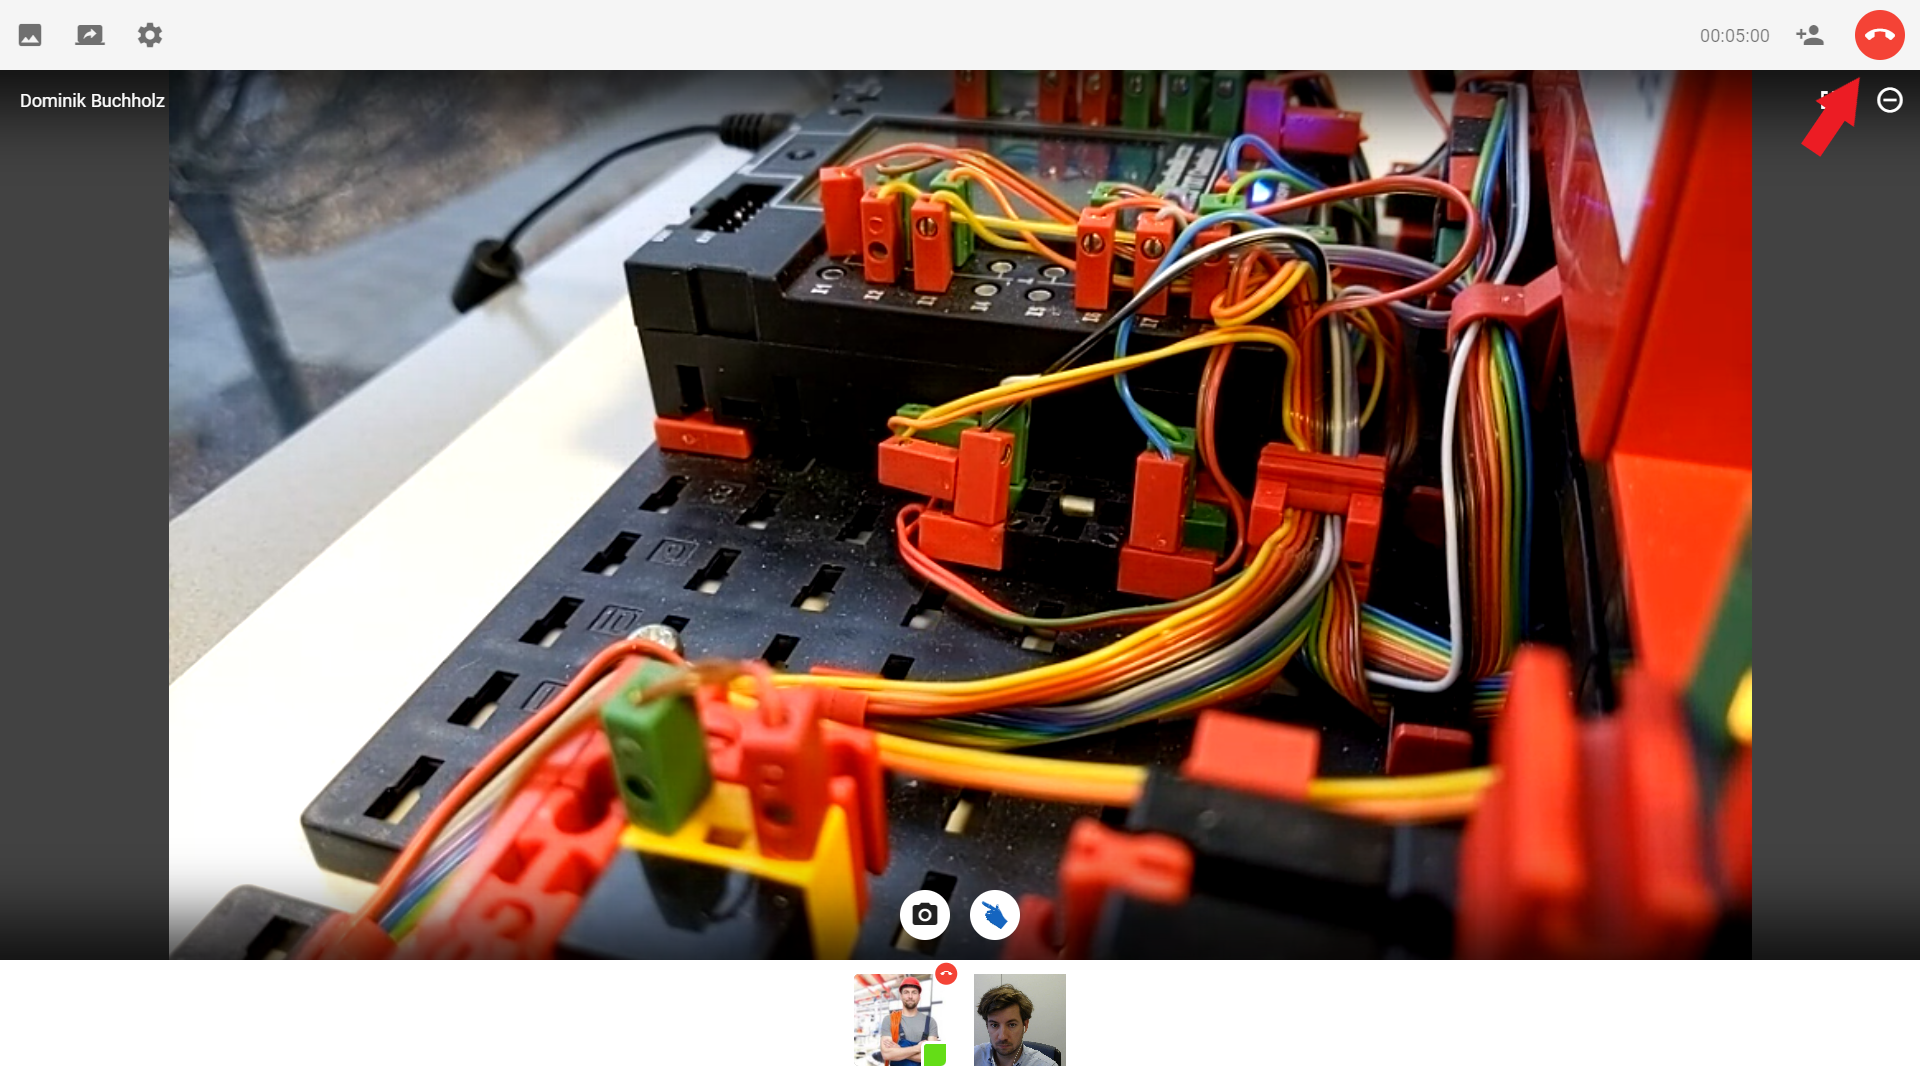
End video conference
To leave a conference and return to the case, click the red phone icon in the upper right corner of the screen. When you leave the conference, the connection remains for the other participants. Each participant must therefore leave the conference independently if you want to end it completely.
HIER BEGINNT EIN NEUER ABSCHNITT
Desktop - Open cases
Manage documents
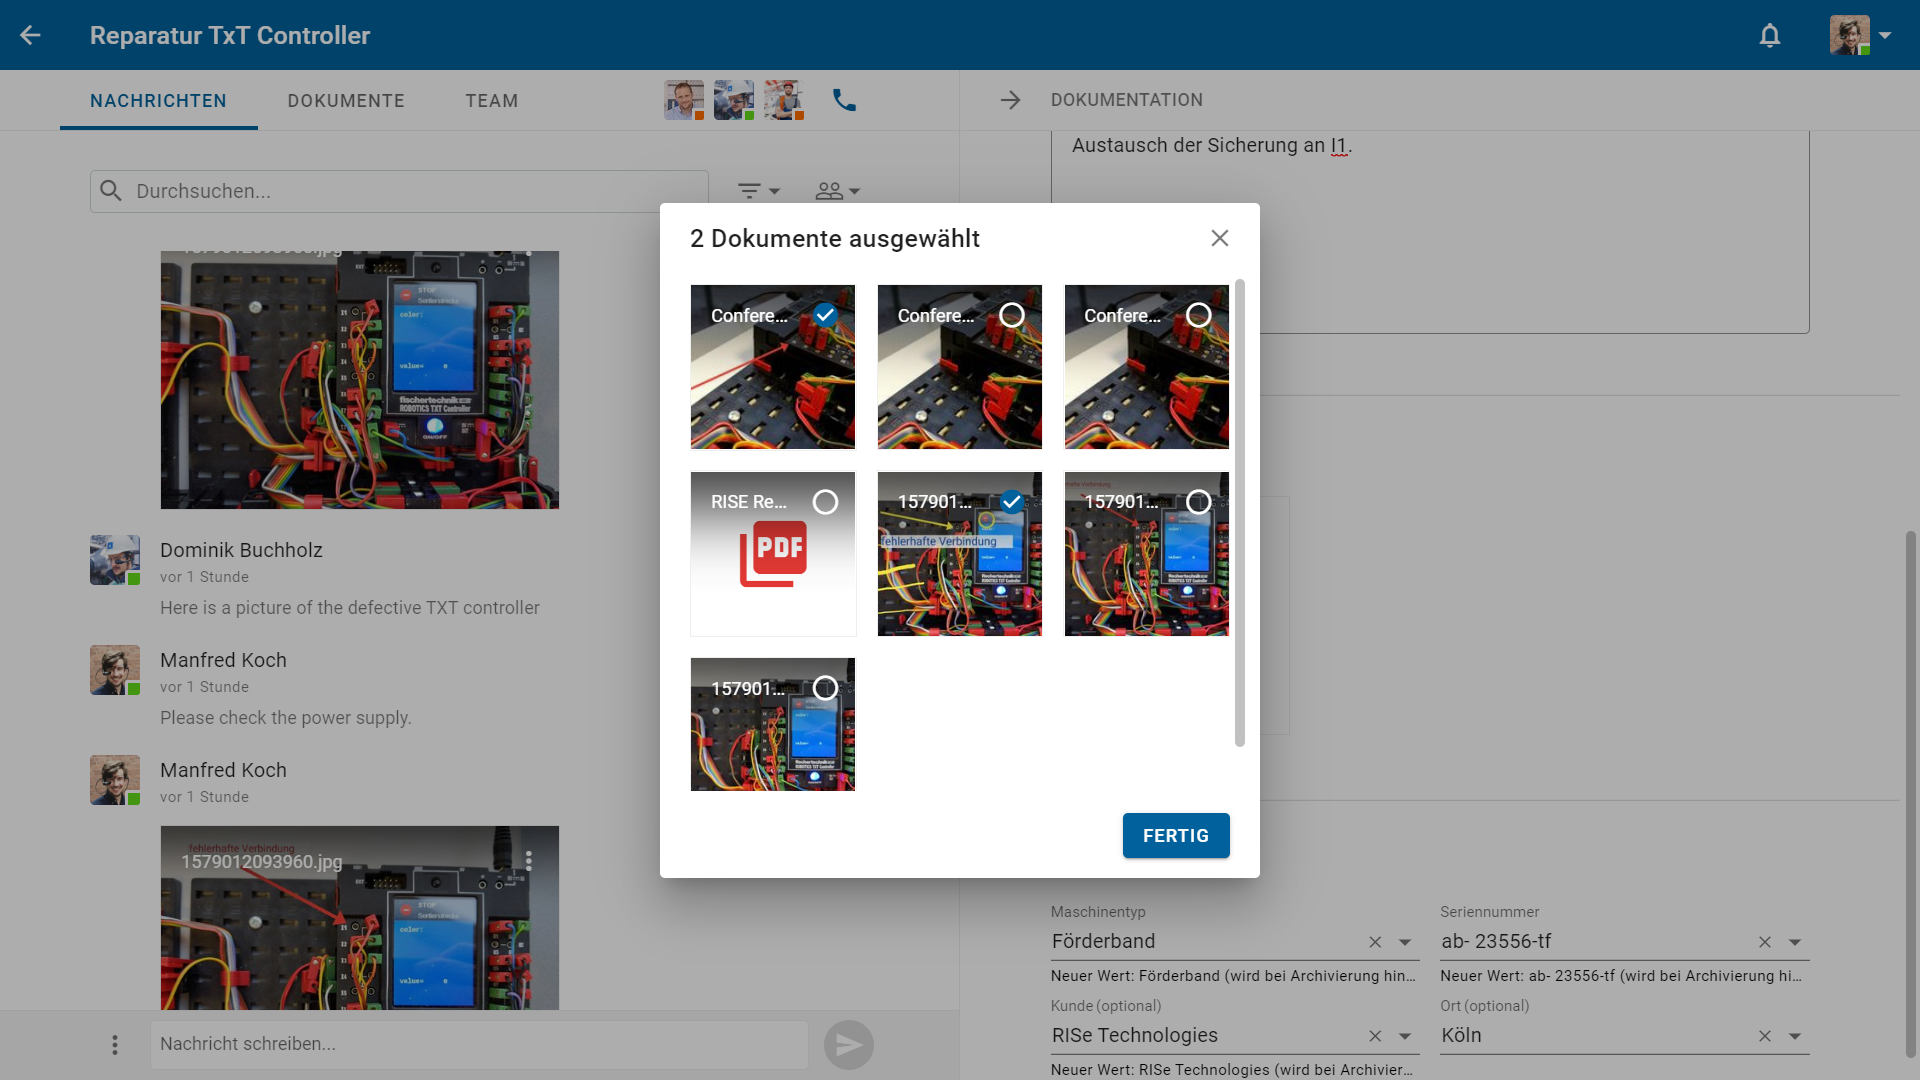
Open document overview
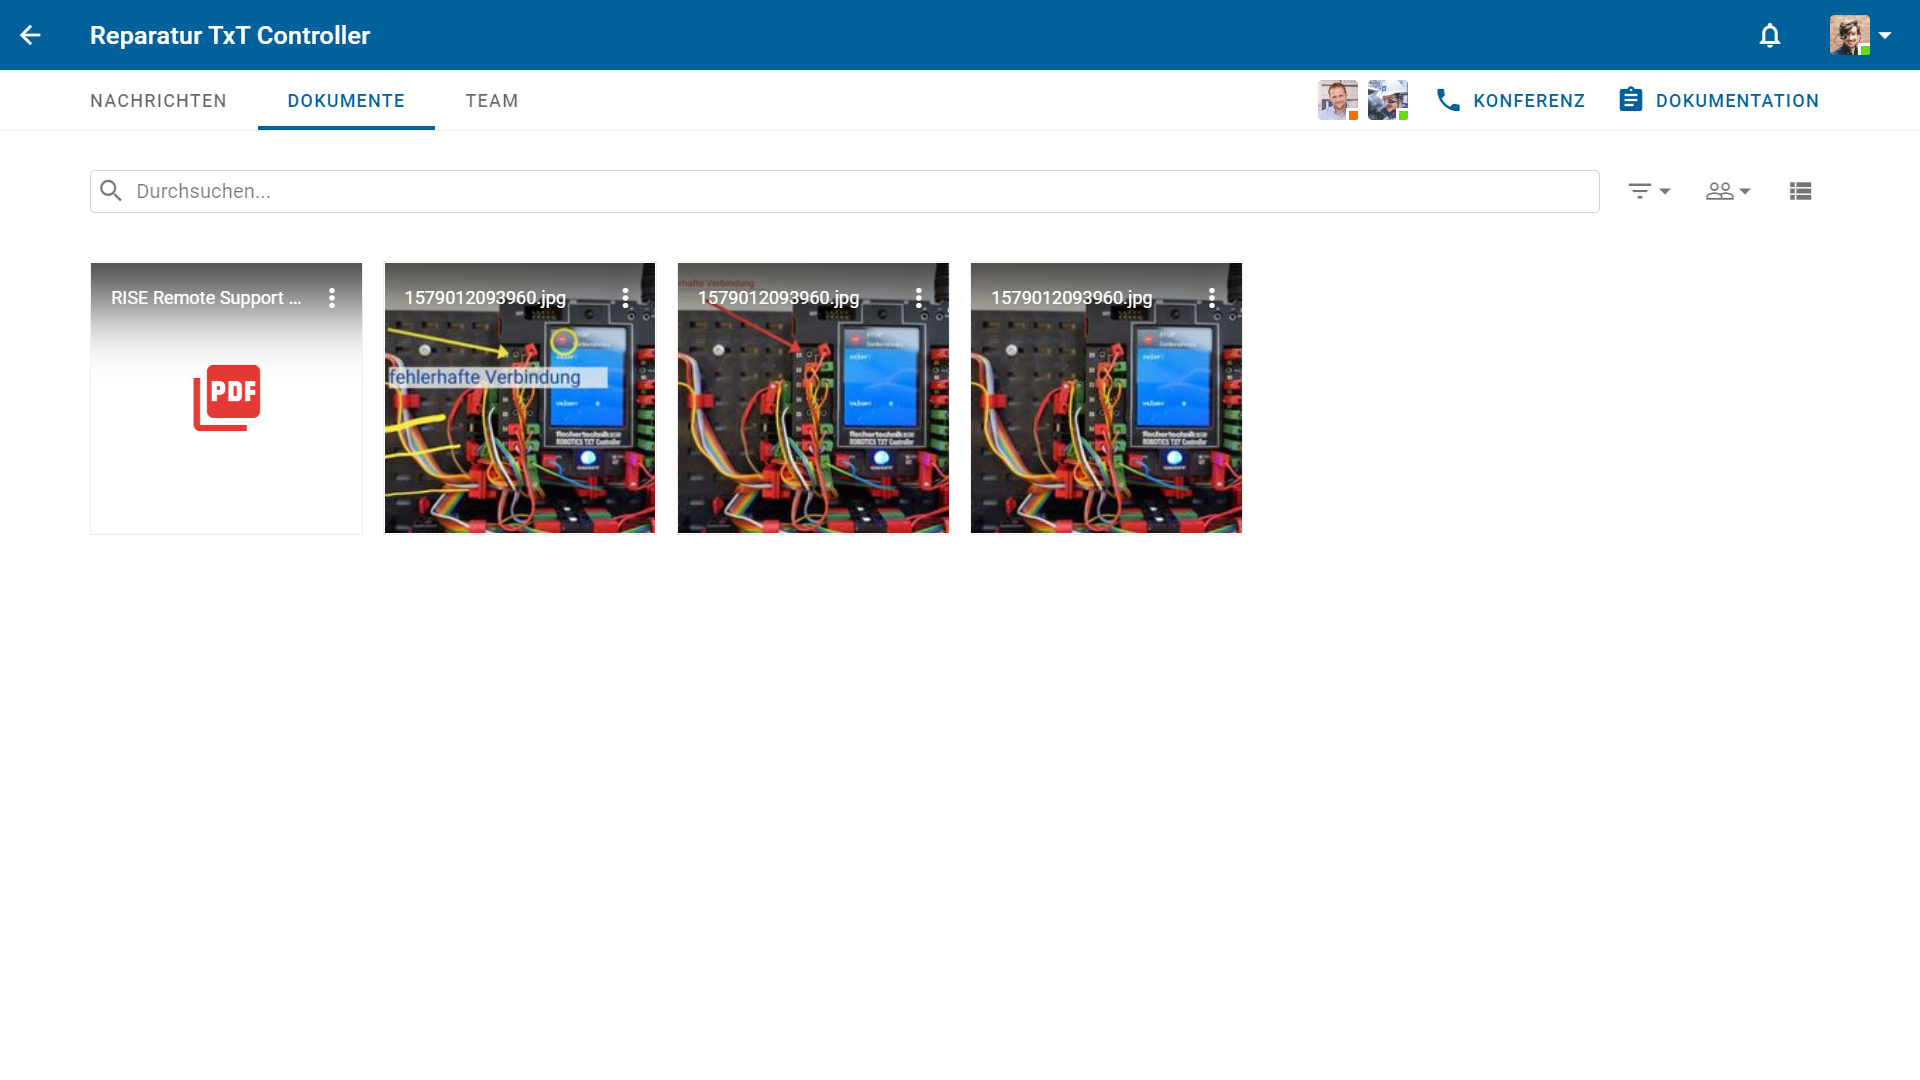
Within a case, there are three tabs in the top navigation bar. Here you can choose between „Messages“, „Documents“ and „Team“. When you create or open a case, you will always see the message history first. Click on „Documents“ to see an overview of all images and documents shared in this case.
Filter documents
If you want to access a specific document, you can simply use the filter to hide certain media, such as audio recordings or videos. You can change the view between list view and tile view in the document overview as you like.
HIER BEGINNT EIN NEUER ABSCHNITT
Desktop - Open cases
Manage team
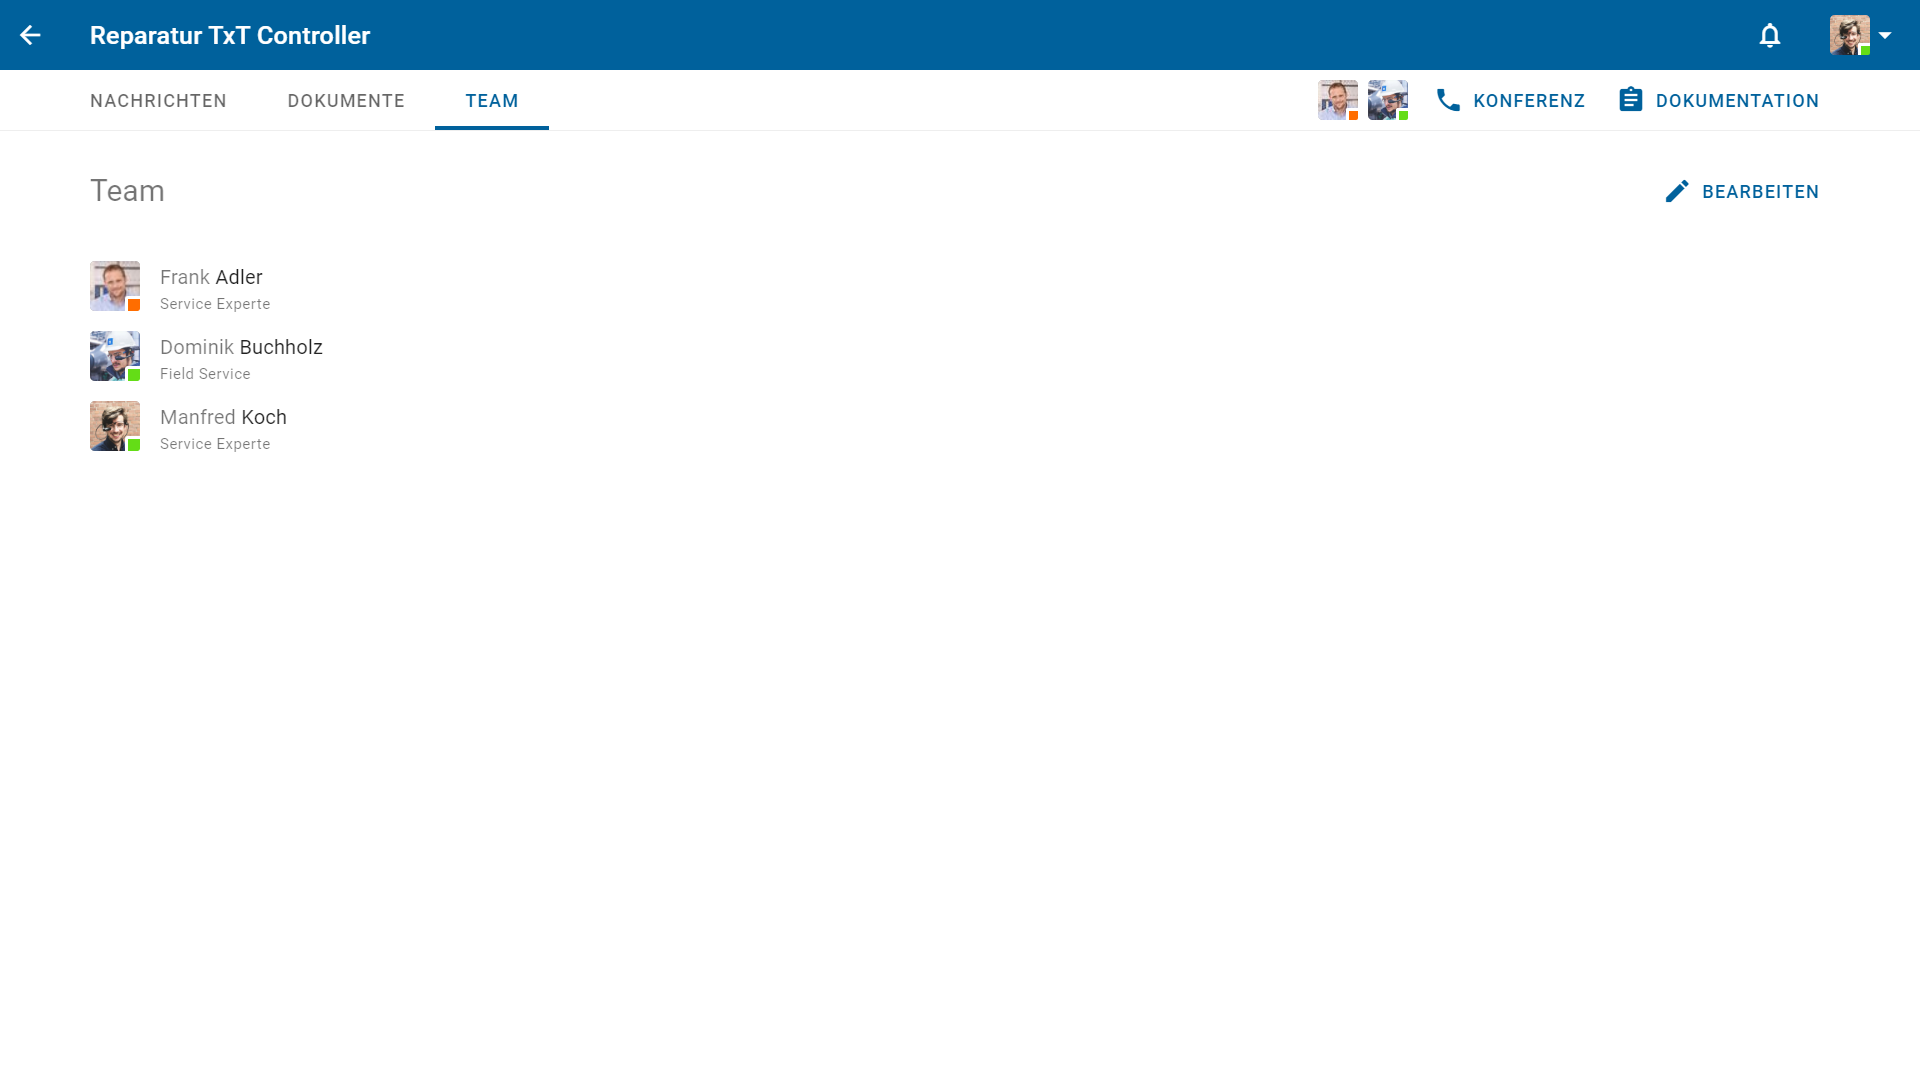
Overview of case members
If you want to add a colleague to a case afterwards, click on „Team“ in the upper navigation bar.
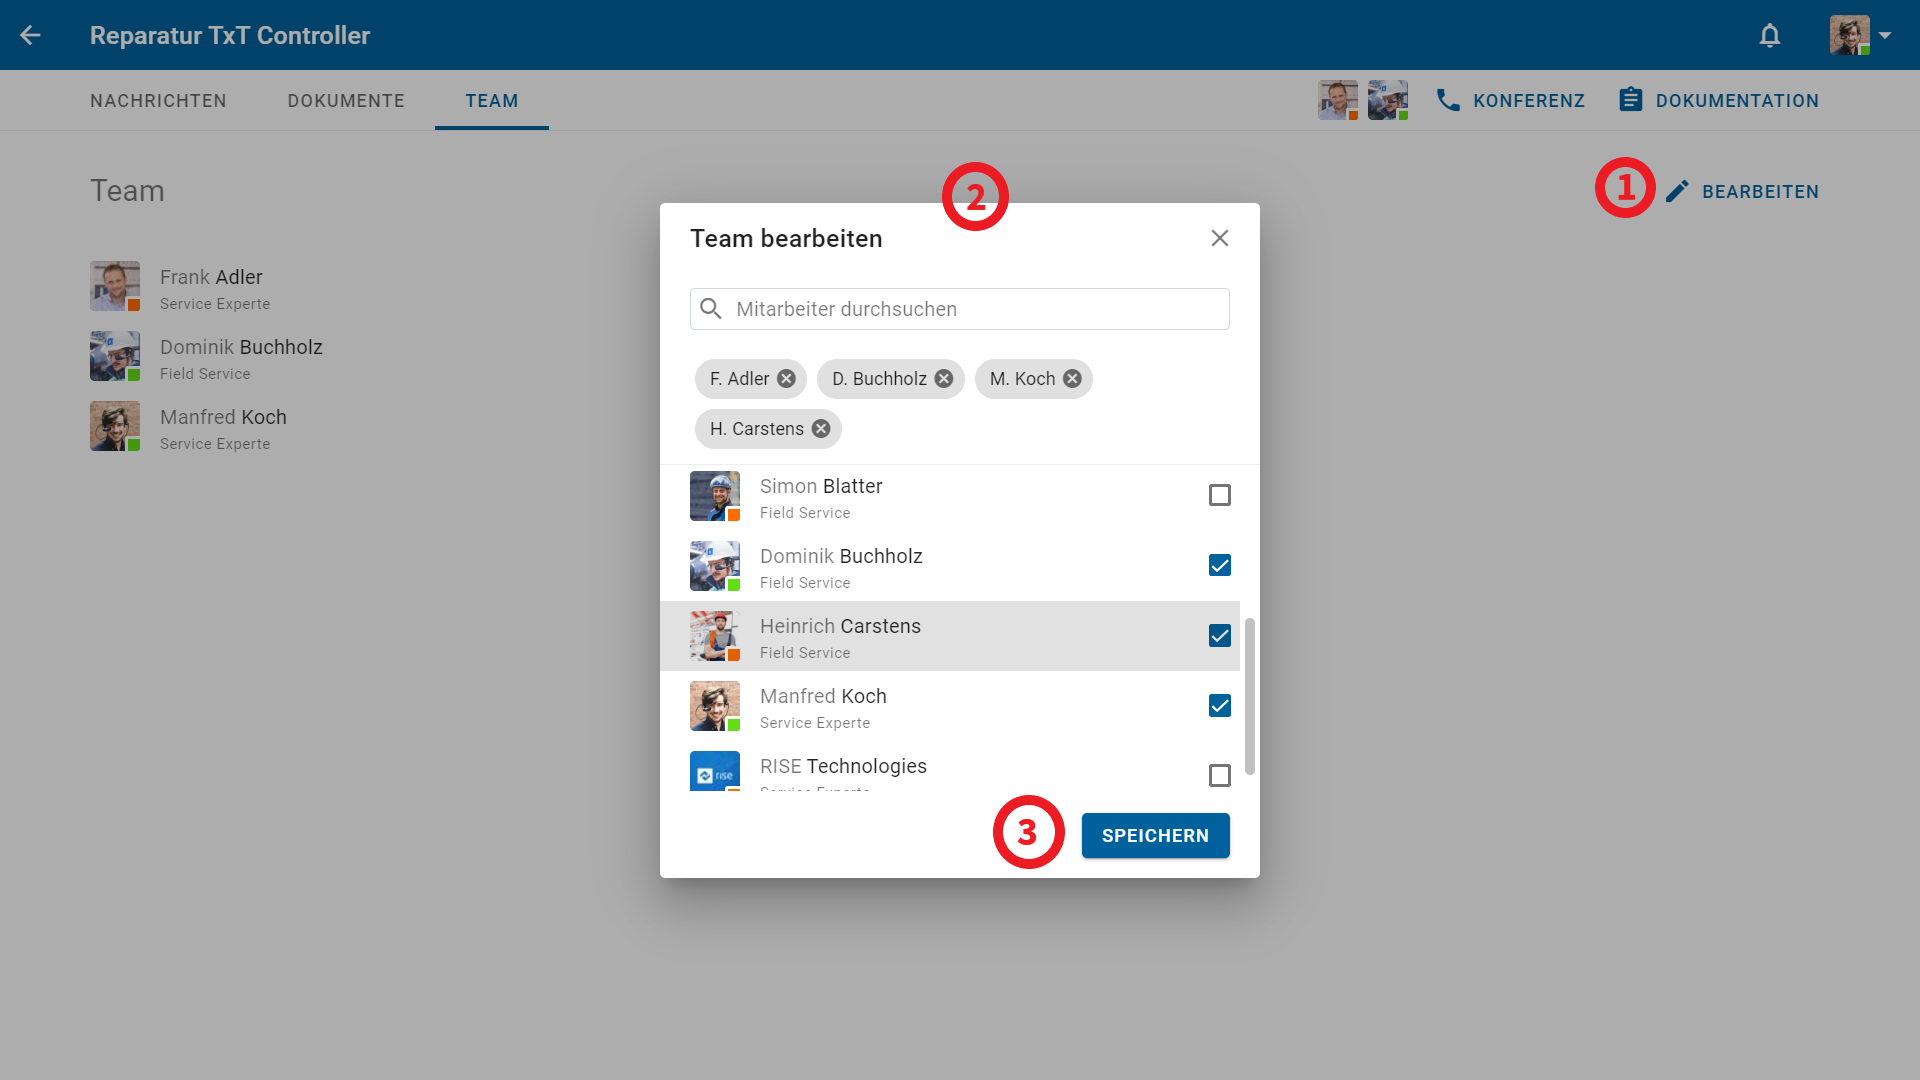
Edit case members
Then click on the edit button in the upper right corner of the screen. This will open a small window that lists your entire team. Select all the members you want to add to the case or possibly remove. Click on „Save“ to update the case members.
HIER BEGINNT EIN NEUER ABSCHNITT
Desktop - Open cases
Create documentation

Add a new documentation
The documentation allows you to edit the case title, problem description and the filters you entered when creating the case. To do this, simply click on „Documentation“ in the upper right-hand corner of the screen and then on the pencil icon to edit the texts.
Supplement documentation with helpful documents
If certain documents, images or videos have helped you find a solution, add them to your documentation as well to make your documentation as understandable as possible.

Finish documentation
Once you have filled in all the fields and added images to your documentation, all you have to do is click on the „Save“ button.
HIER BEGINNT EIN NEUER ABSCHNITT
Desktop - Open cases
Archive case
Archive closed case
When you have successfully completed a case, you can archive the case. The case summary can be viewed in the archive by all colleagues and serve as an informative knowledge case for future problems.
To archive a case, open the documentation of the case and then click on „Archive case“. As soon as you click on „Archive“, the case moves from the open cases to the archive.
HIER BEGINNT EIN NEUER ABSCHNITT
Desktop - Open cases
Create PDF

Export PDF
You can also export the documentation, or its summary of the case, as a PDF. To do this, go to the case, open the documentation and then click on the „PDF“ button in the upper right corner of the screen.
The creation of the PDF takes a short moment. Once the PDF is created, you can download and save it to your device.

Open PDF
In the PDF document you can now see all the information that was entered in the documentation. Additionally, there is a link in the document that allows you to open the corresponding case directly with the Google Chrome browser.
Headquarters Cologne
Zugasse 23
50678 Köln
info@rise.tech +49 221 300 633 00
Support
If you do not find the answer you are looking for in our manual, you can contact us personally. Contact our customer support directly at: support@rise.tech
© 2022 RISE Technologies GmbH. All rights reserved.